Standard Upgrade - Recommended Procedure
This guide assumes for simplicity that you have Zen Cart installed in a folder called store. This configuration (placing your store in a subdirectory) allows you to run your old store and your new store side by side for testing before going live. If you didn’t install your current store in a subfolder, you can still install your new store in a subfolder for testing, and then remove the subfolder and install at the top level when it’s time to go live.
Note that if you are installing a test version of your cart that uses a different version of PHP than your live site, see Multiple PHP Versions for instructions, since the procedure is a little different.
This guide also mentions cPanel when referring to the Control Panel offered by your hosting company for managing your hosting account’s databases, file permissions, etc. While cPanel is a popular brand, your hosting company may offer something else. Consult them for help if needed.
Further, this guide is assuming that all your testing will be done in a temporary store on your same server (and a temporary database). If you are more technical and have a “local development environment” on your PC (such as XAMPP) then you could adapt all the following instructions to refer to directories/databases on your PC, and prepare everything locally before moving the files to the real server when it comes time to “go live”.
Getting Ready
-
Backup. Before you begin, remember to make a complete backup of your files and database. This will be repeated often!
-
Content of new versions
Upgraders, be sure to familiarize yourself with the content of each of the new versions released since the one you were previously using:
- Relevant What’s New details for releases since the one you were previously using.
- The Release-Specific Considerations page which points out special cases to consider.
- You should also spend some time getting familiar with any additions made to the demo data in the new version, so that you can become comfortable with any new features contained in the new release.
-
Tools
To upgrade Zen Cart, you’ll need the same basic tools you used to install and customize it in the first place: An FTP tool, a text editor for HTML/PHP code, phpMyAdmin or equivalent access to your MySQL database, and your hosting company’s Control Panel for managing your webspace.
-
File Comparison Tool
Additionally, you will find a file-comparison tool to be highly beneficial. Particularly, a 3-way comparison tool is preferable. See the list of Useful Tools for suggestions. (While the free tools offer 2-way comparison, many offer 3-way comparisons in their paid versions.)
-
Compatibility
First, check whether your server is compatible with the version you’re trying to upgrade to.
After familiarization, upgrading follows three core stages. We suggest you take your time going through each stage carefully and methodically. Don’t rush the process.
And as always, be sure you keep good backups before you begin and perhaps additional backups at various steps along the way.
0. New version familiarization (optional)
This step is helpful if you have never done this before, to give you more confidence in creating databases and uploading files.
It’s also helpful just to take a tour of the new version to see how any new features work.
Install it, just like a fresh store: Unzip a copy of the new version of Zen Cart, upload it to your webserver into a demo folder. Create a new demo database in cPanel, when you install the new version of Zen Cart, set it to use the new demo database. Be sure to include the Demo products when you install. This is just for a place for you to play with the new version and get used to its new features. These can be deleted after conversion is complete.
Study the new features, and the documented changes to the template structures, as well as the “changelog”. Use the demo products in the demo shop as examples. See also the supporting documentation provided with the new release.
When you’re done with your testing, remove the demo directory and the demo database you created for it.
1. Preparation
Make backups
Make a full backup of your live database (dump to SQL file). Store this file on your PC for later reference.
Make a full backup of your live site files (ftp to your PC and zip it up for safe-keeping).
Working Directory
On your PC create a directory/folder to hold your store’s “old” files.
For this document we will assume you named this folder store.
Remember that backup you just made? Place an unzipped copy of your website’s files in this store directory.
Build a list of all your existing customizations
All sites are customized in some way! There are two main kinds of customizations you need to enumerate:
Plugins, Templates, and other Addons
Make a list of all the plugins you’ve installed, and where you obtained them from. Same with your template.
You may already have a list, but be sure to double-check it thoroughly!
It’s important to also find out what version of Zen Cart and PHP that old plugin/template was designed for. … and whether there’s a new version available, particularly a version that suits your new Zen Cart and PHP requirements.
If they don’t have obvious updates posted, consider reviewing the Support Thread for the plugin (if any), and/or contacting the plugin/template author.
If you bought the plugin or template (or if a paid upgrade is available), consider paying for an upgraded version.
File Changes: Alterations made to the files on your server
NOTE: This is a time-consuming step, and will feel very “technical”. Be sure to set aside time when you will not be distracted.
Now let’s find out the differences/customizations between your site and the original Zen Cart files.
(You can find older versions of Zen Cart here: https://sourceforge.net/projects/zencart/files/)
Comparing Sets Of Files
Advanced Tip: You will probably discover that combining the following “discovery of customizations” with the “execution” step will save you time.
Unzip a copy of the original Zen Cart files for the version you originally installed or last upgraded from (ie: perhaps v1.3.9 or even 1.5.1). This should be placed in a separate working folder on your PC (perhaps zen_orig).
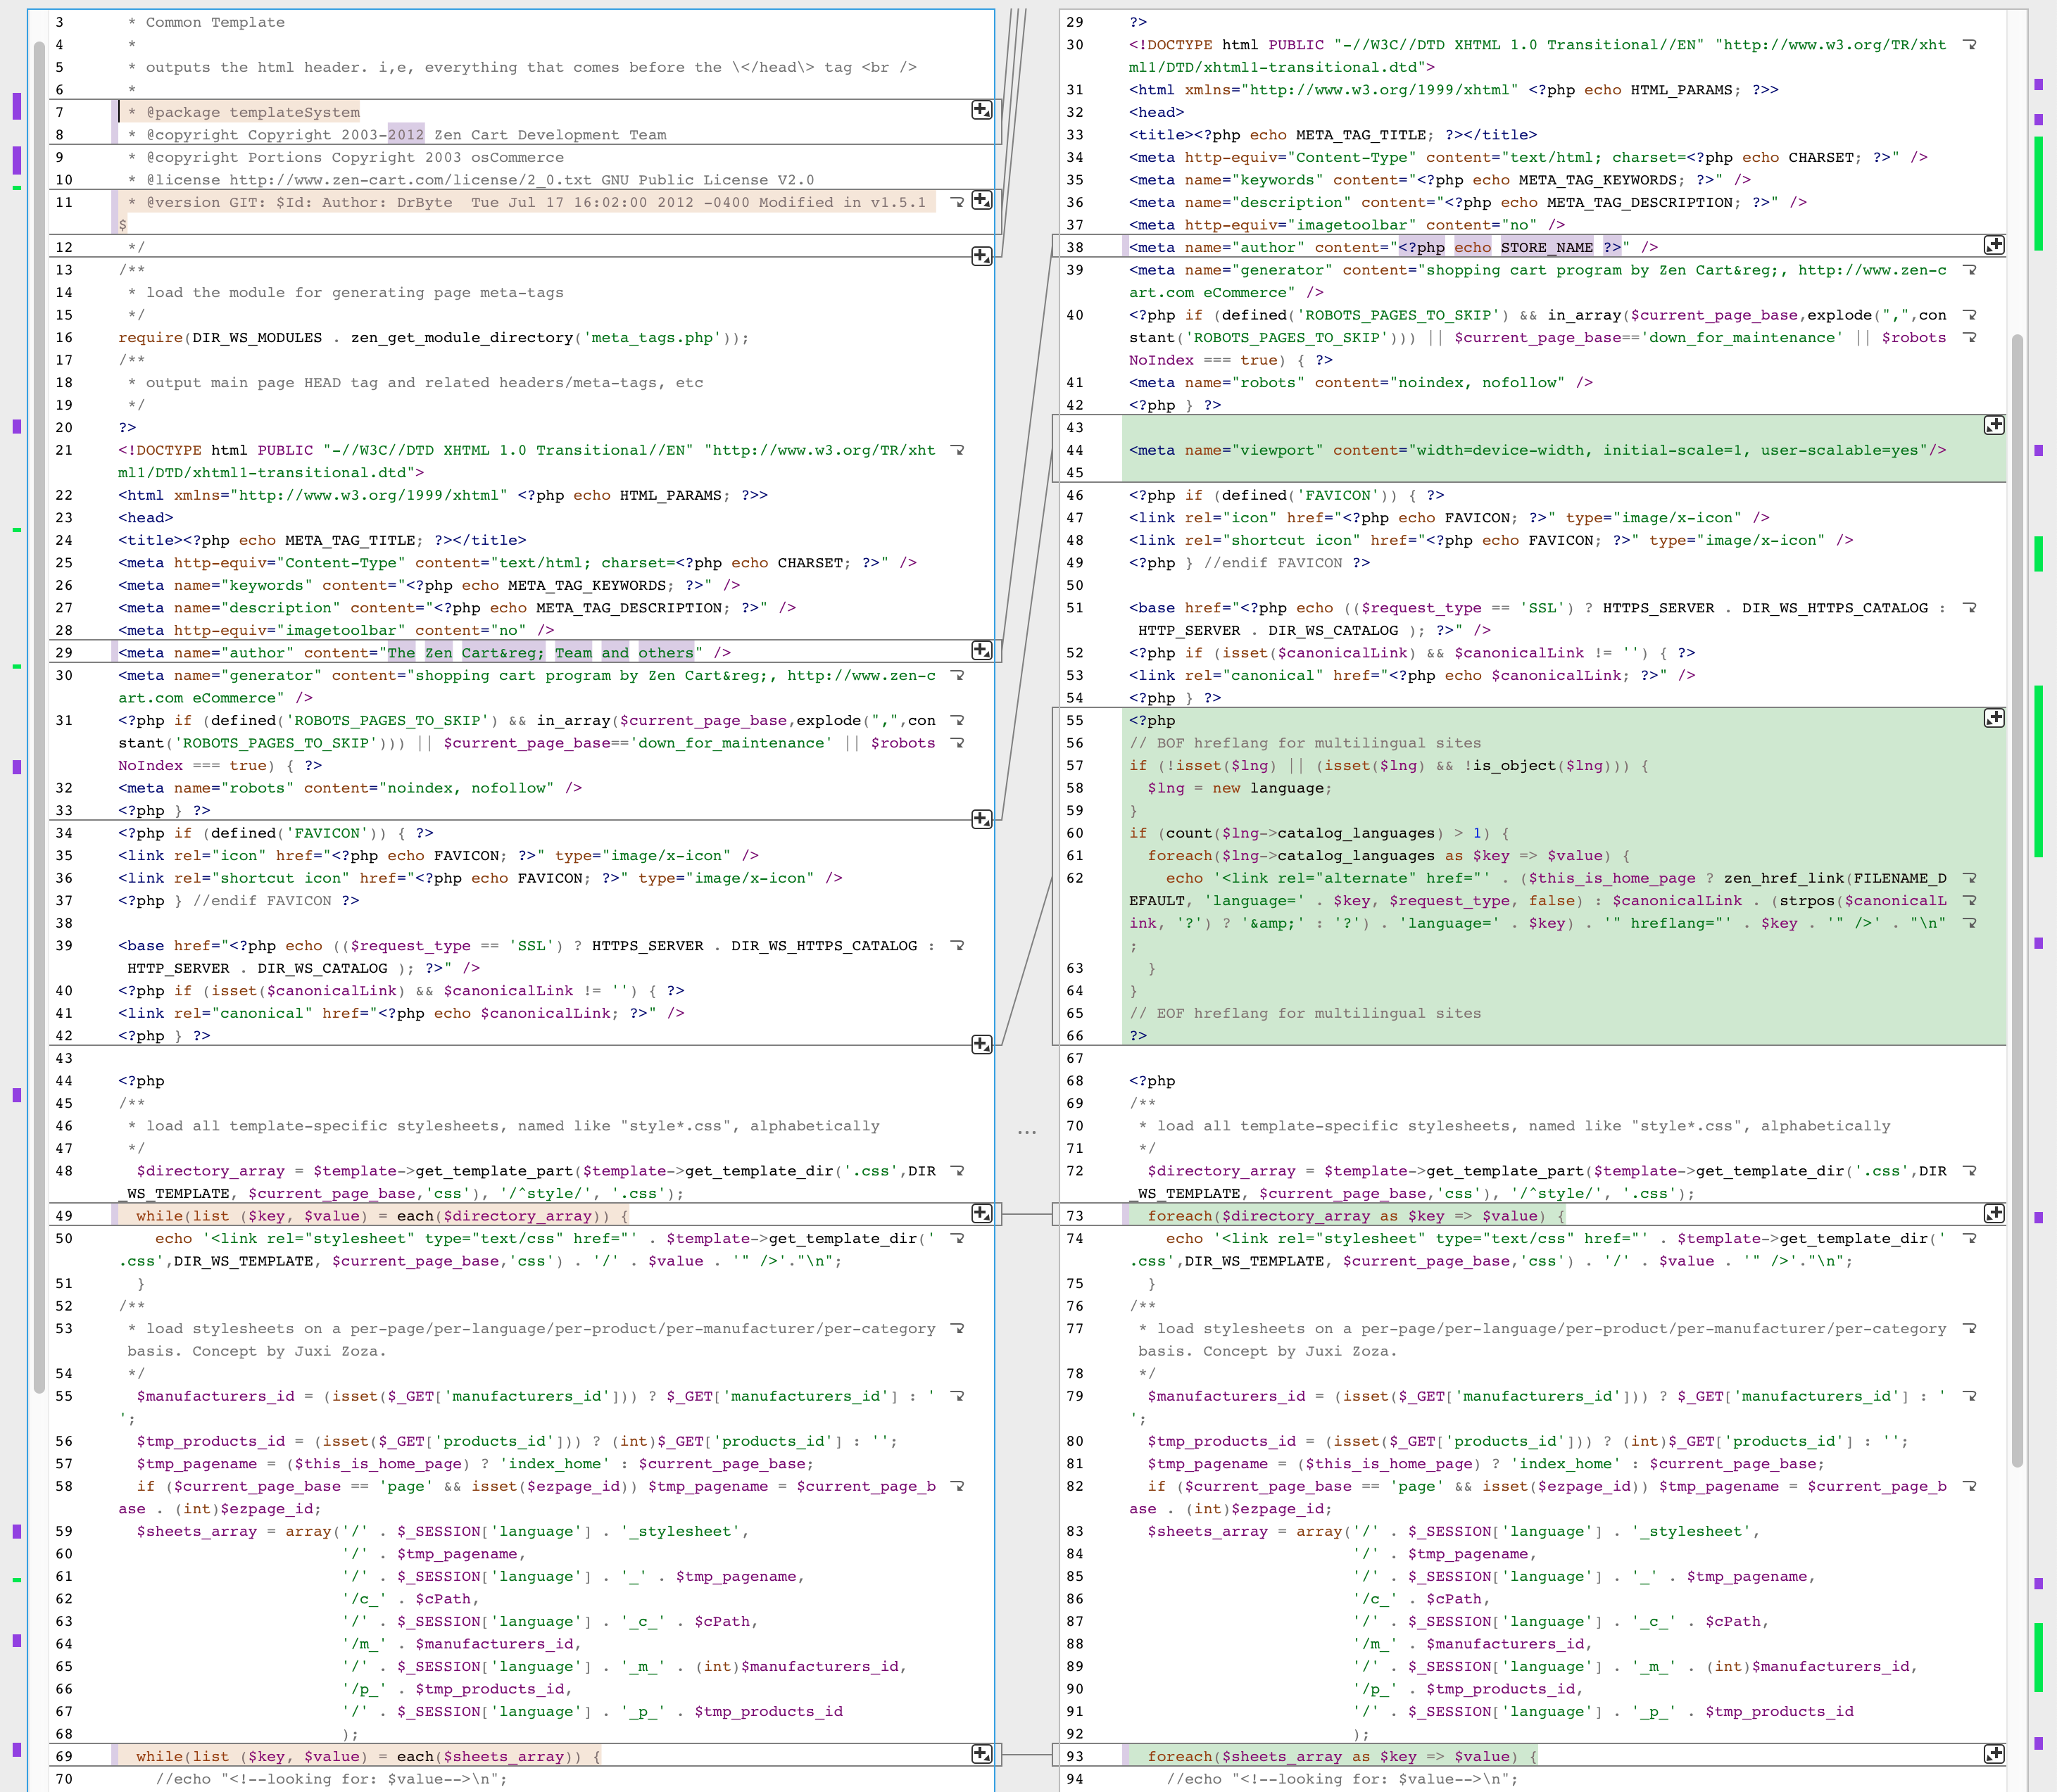
Run a tool like WinMerge to compare the “Original” Zen Cart files in zen_orig against your current live store files in store.
So, in WinMerge, in 2-way-compare mode, you would open the zen_orig directory in the left column, and the store directory in the right column.
This way, in the right column you’ll see all the ways in which your store’s files are different from the original files on the left.
This document is written with the assumption that you’re using only a 2-way-capable comparison tool. If you have a 3-way compare tool (WinMerge can do that) things will go much faster: column 1 is
zc_orig, column 2 isstoreand column 3 iszc_new… and you merge (copy) any changes between columns 2-3 into column 2 where they don’t clash with column 1. Anything changed between columns 1-2 is a customization you made or a plugin has made, so you want to keep that or at least merge it with whatever is new in column 3 if anything. This sounds complicated when just reading it in words, but in practice it becomes visually quite intuitive.
Here we are taking a list of how your actual site is customized vs the original files.
Make note of all the files that are “different”, and how. In WinMerge you can double-click on each file and note what the differences are.
Here are some examples of how WinMerge will allow you to see differences in files.
Comparing Directories
Comparing Files
Types of File Differences
There will be many differences:
- language defines for displayed text - those will be simple to carry forward.
- actual programming/code differences – for these you will need to make detailed notes in order to carry over those changes to the new version.
- plugins/addons you’ve installed – these often contain numerous programming changes, and may not be fully compatible with the newer Zen Cart release or a newer PHP version. Be sure to check if there’s a more up to date version of a plugin you are using during an upgrade.
Sometimes you won’t know why the code is different. You may not recognize why you would have ever changed it. Lots of times it may be that those changes are from a plugin you installed, especially one that changed original Zen Cart files. Your list of add-ons/plugins may help you narrow down the source of any differences you’re finding between versions. You may have to download the add-on again (ie: the older version of it) to take a look at the readme or code contained in it.
While you’re reviewing PHP/JS/CSS files you might be reminded of some plugins or template customizations that aren’t on the list you made earlier. Be sure to note them and then research them for upgrades.
Consider moving customizations into a standard override structure
As you make your list of changed files, this may be a good time to move your store-specific changes into the Zen Cart template-override structure, if you haven’t already done so. See the Template System Documentation for help on the template system.
The benefit of moving these customizations into specific override files is that these overrides are simpler to compare/upgrade in the future, and may mean less work when it comes to the “actual” upgrade in following steps.
Using overrides isn’t a magic pill, but it does simplify things a lot if only by virtue of isolating customizations so you know which things “definitely need attention” or “these differences I see are intentional changes I made” (otherwise sometimes it’s hard to remember whether you wanted it that way or not).
Handling custom date fields in your database
If you have modified the structure of your database to add custom date fields, please see date standardization.
2. Execution
Download and unzip the latest Zen Cart version to your PC. This will be in a 3rd directory (perhaps store_new), separate from the other two folders compared above (eg store and zen_orig).
Using the list of files you made earlier, go through each “changed” file, and re-make your changes from the old version onto the new version.
IMPORTANT: You always want to build on the latest set of Zen Cart files. This means
store_newcontains the current version of Zen Cart, and you apply your changes to that. DO NOT start with your old version and apply the changes from the latest version of Zen Cart.
Clarification: here you are essentially re-building your
storecustomizations onto thestore_newdirectory.
-
Simple language edits will be just a matter of copy-and-paste (or if you’re using WinMerge you might be able to click to copy over individual customized lines).
-
Programming changes in core Zen Cart files will be more difficult and require significant testing.
You may sometimes find WinMerge handy at this stage to apply edits as well. However, you will see many extra differences that may not be related to your own customizations (they might be from plugins you had installed), or that may conflict. Be careful making changes to program code.
-
Don’t forget to ALSO compare and review AND UPGRADE all the files that you have overridden using the template overrides system. (Merely being overridden doesn’t mean they don’t need to be upgraded too!!!!)
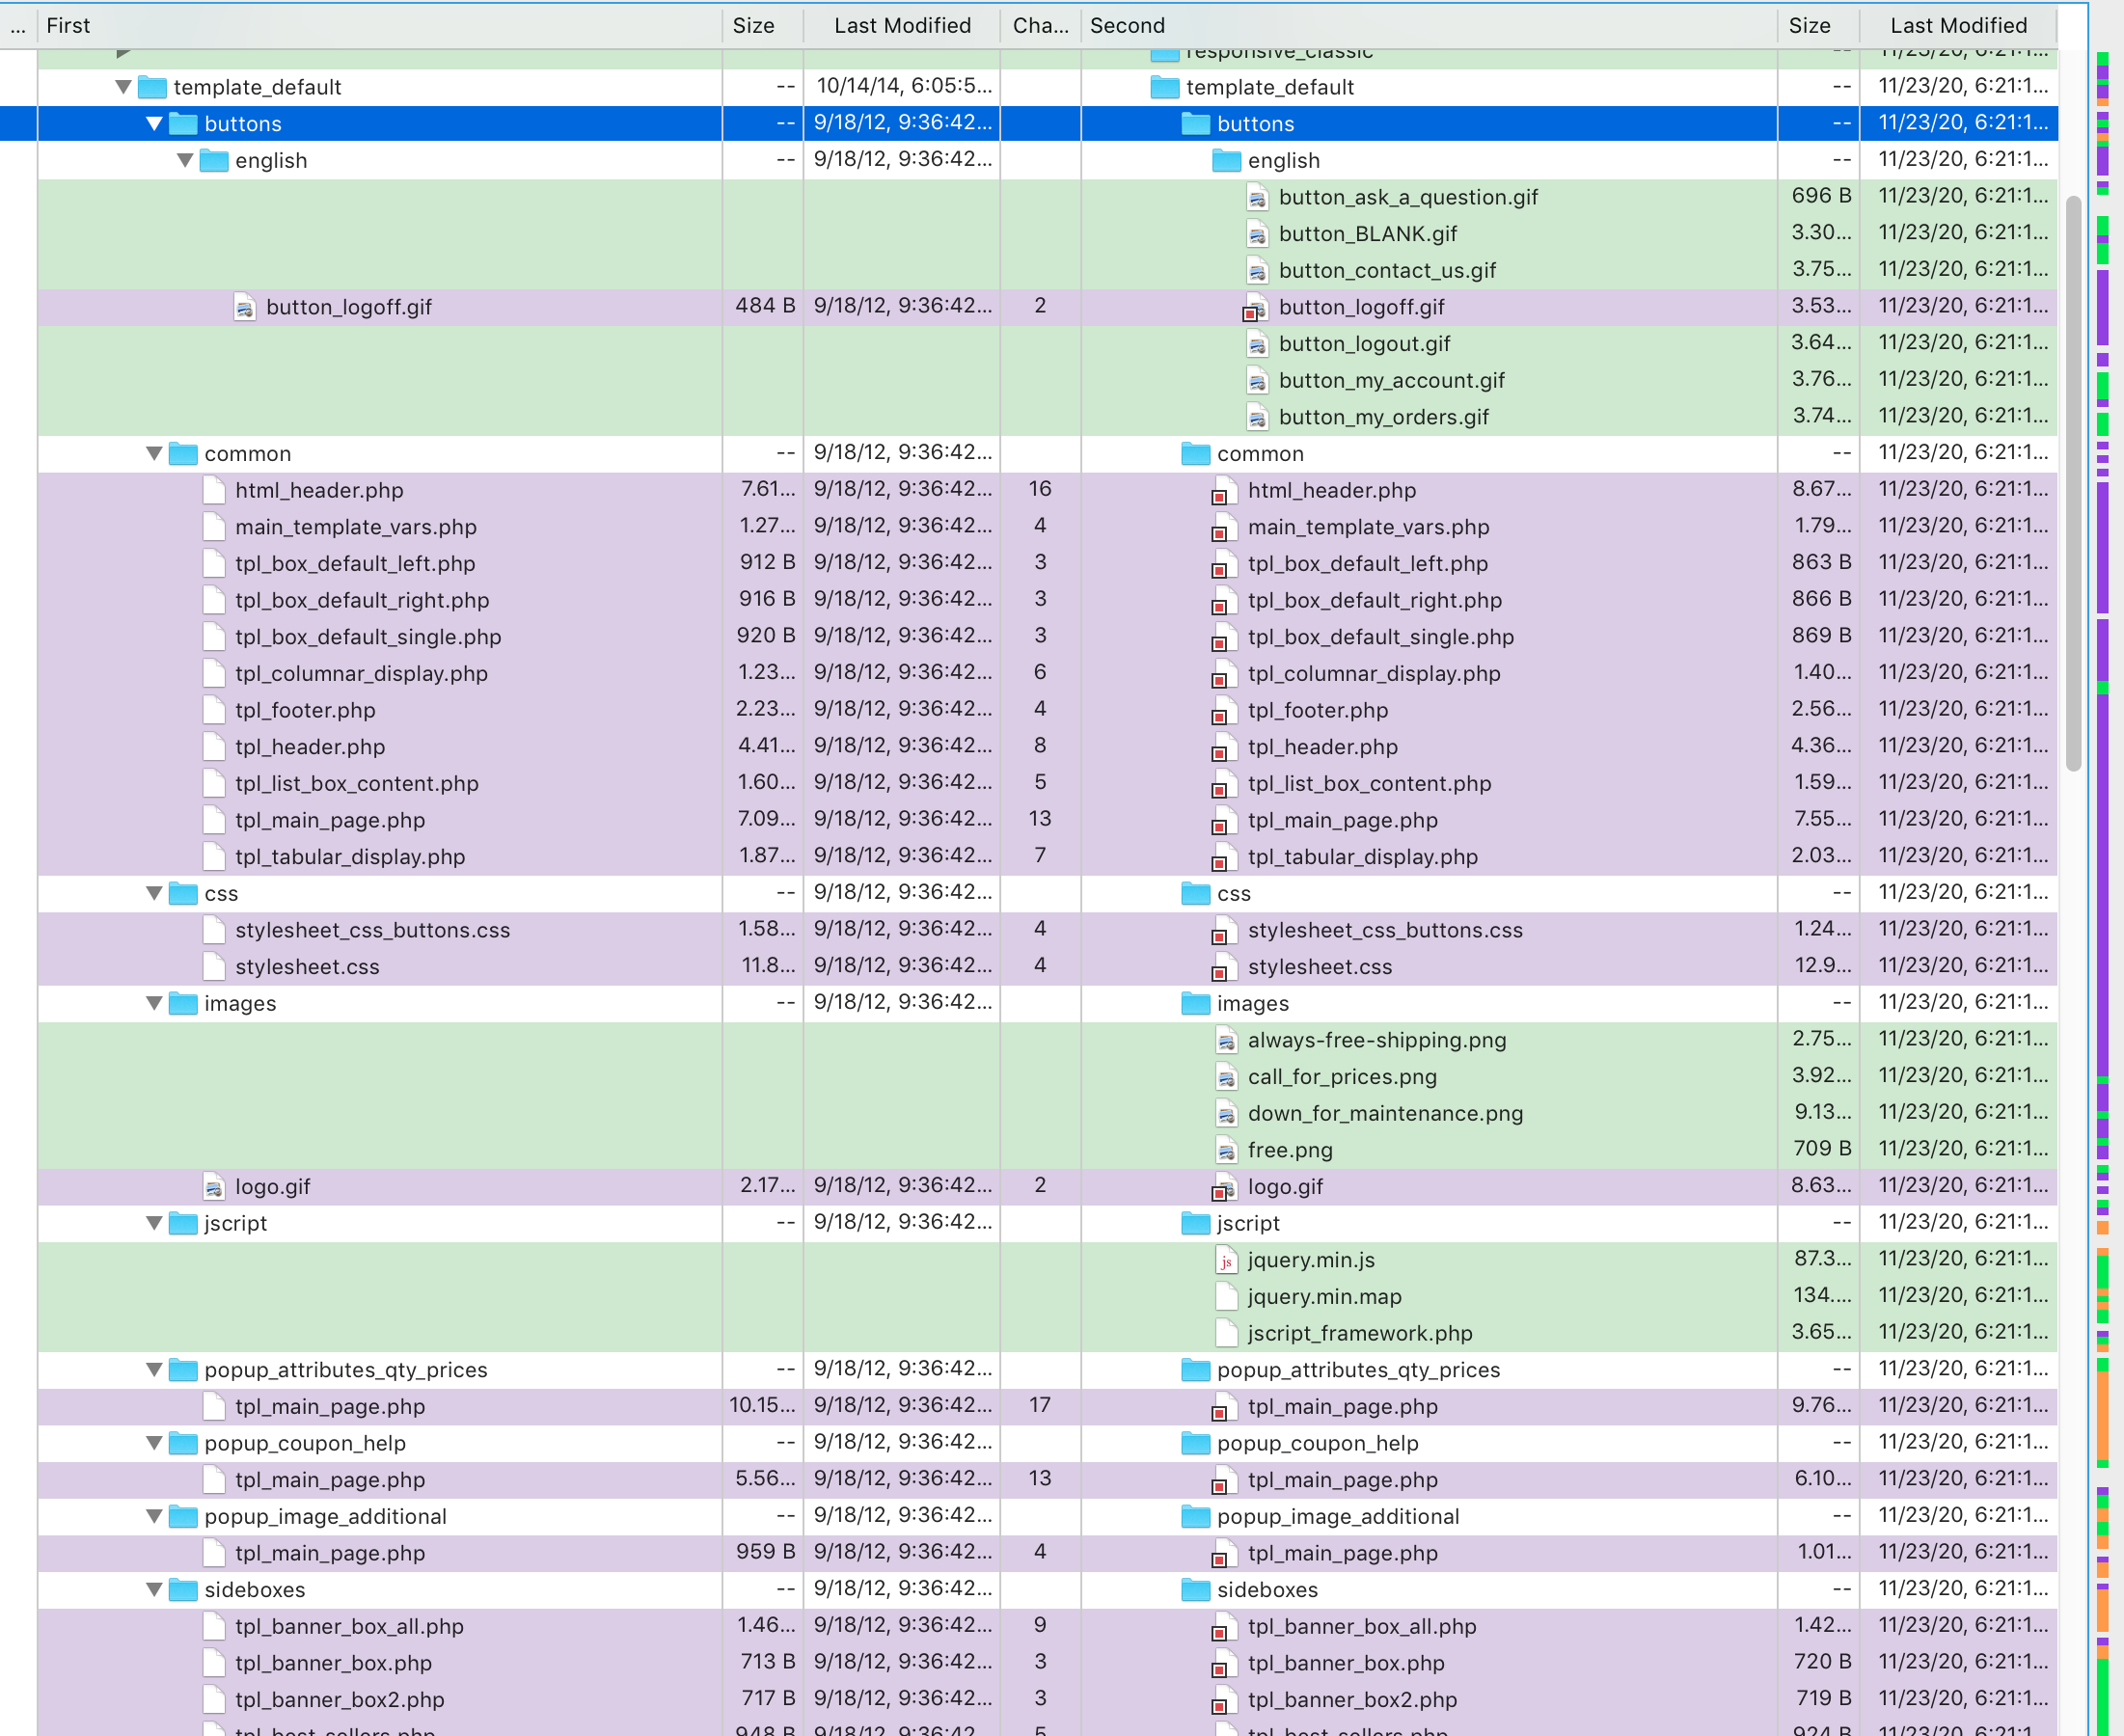
- So, for example, you need to compare files from
/includes/templates/MYTEMPLATE/*with/includes/template/template_default/*, - and
/includes/modules/FILE.phpwith/includes/modules/MYTEMPLATE/FILE.php - and
/includes/modules/sideboxes/FILE.phpwith/includes/modules/sideboxes/MYTEMPLATE/FILE.php - and
/includes/languages/FILE.phpwith/includes/languages/MYTEMPLATE/FILE.php - and
/includes/languages/LANGUAGE_NAME/FILE.phpwith/includes/languages/LANGUAGE_NAME/MYTEMPLATE/FILE.php - etc (see the Template System Documentation for details on the override directories!)
Clarification: use WinMerge to compare these original directories against your override directories, just like you’re comparing other directories with each other. Sometimes using 3-way-mode makes it easier to visualize what parts of individual files were actually customized, so you can decide whether to keep the difference or not.
- So, for example, you need to compare files from
While sometimes it may seem that the overrides files mean double work, it’s still very useful to know that most of your non-override files won’t require special attention, and you can focus your work on mainly the override files. (Again, this assumes you’ve diligently used overrides.)
-
Install updated versions of plugins. This includes unzipping and moving the updated files into their respective directories, and doing any installation/upgrade steps their documentation mentions. If database updates are required too, do them.
Also make detailed notes of these steps you take so you can re-do them on your live store when it comes time to do the real upgrade with real data. Also read the plugin’s upgrade documentation to note whether it says that some “old” files (from older versions of the plugin) are no longer needed. Be sure that you don’t accidentally copy those old files from the oldstoredir into thestore_new! You will want to be sure to make note of these specific files so that you can double-check the live server later after the upgrade is done to make sure you delete the necessary files there too. -
For any plugins/addons you are no longer using, do any uninstall instructions associated with them, including removing their files and removing any database components. If some of this can be done to your “live” site before actually going “live” then sometimes this makes the go-live step simpler.
3. Testing
Note: As an alternative, rather than testing on your server, you can set up a local development environment and test there. This is particularly important if your old cart version uses a PHP version that’s older than the minimum version required by the new Zen Cart version. In this case, you won’t be able to run old and new side by side on the same server.
Take a fresh backup
First, take a fresh database backup from your live store:
- In your live store, go to
Admin > Configuration > Website Maintenance. Put the store in maintenance mode, and add your IP to the list in theDown For Maintenance (exclude this IP-Address)field. - Make a fresh backup of your live database.
- Put your site back into normal mode (turn off Down For Maintenance).
Create a temporary new store on your server, for testing
Create a NEW database in cPanel. Create a database user that has full permissions to access this database.
Use the backup that you just made from your live site to fill the database with data. (See restoring the database.)
Prepare the configure.php files
On your PC, in your store_new folder, copy
includes/dist-configure.phptoincludes/configure.phpadmin/includes/dist-configure.phptoadmin/includes/configure.php
Edit these two files and set all the parameters, using your existing live store as a guide.
- Remember to specify your NEW database name when filling in
DB_DATABASE. - But remember to use the same
DB_PREFIXvalue from the old site’s configure.php file, because if it is not the same then the database tables won’t be recognized correctly. - Set
DB_SERVER_USERNAMEandDB_SERVER_PASSWORDto the new database user and password you created in the first step
Upload the files to a temporary directory on your server
Upload the files from your modified store_new directory on your PC (created in step 2) into a temporary directory on your server, perhaps also called store_new.
Note that if you are installing an upgraded version of your cart that uses a different version of PHP than your live site, see Multiple PHP Versions for instructions, since the procedure is a little different.
Run zc_install to upgrade the temporary database
Clarification: a couple steps earlier we created a new database in cPanel, and restored your backup database to that new database. Thus it contains a (slightly) older copy of your store’s data. Here we’re doing an upgrade on that data so that its structure matches what is needed for the new Zen Cart version we’re testing in these steps. THIS IS NOT THE FINAL STEP, and the data is NOT THE FINAL DATA. This is only temporary for testing, but we’re using a copy of your prior data as a way to test that things “work” and have a sense of confidence that the data showing up is “familiar” and “reasonable”.
In your browser, run store_new/zc_install/index.php and choose “Upgrade” when prompted. (Don’t select “Clean Install”, or you will overwrite your database.)
If the “Upgrade” button does not appear, then the installer was unable to connect to your database to determine its version. Check your configure.php settings and be sure the DB_* fields correspond to your new database, including that the DB_PREFIX matches the DB_PREFIX in your old site.
The zc_install process
Once you press the Upgrade button, the screen will show you a list of updates to be performed.
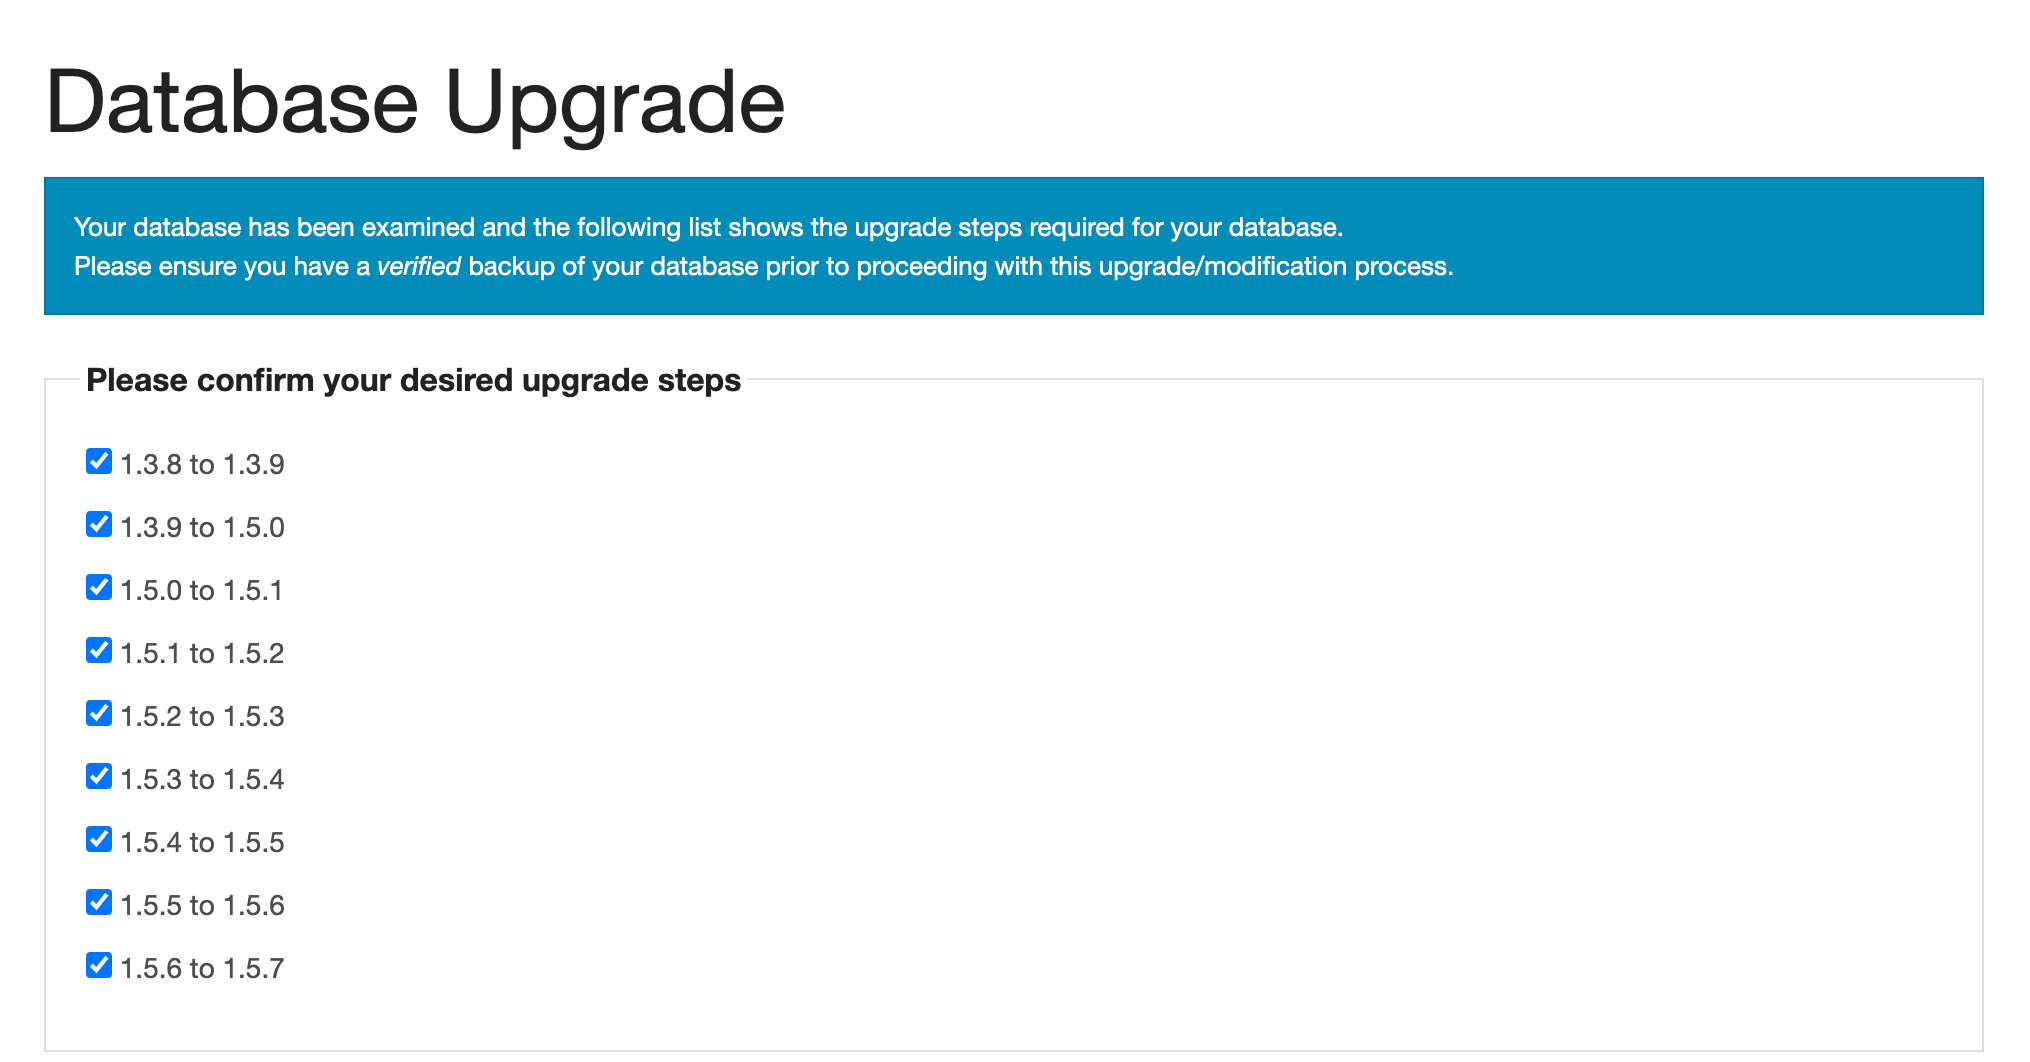
Be patient - it can take a while to do all the updating required.
Once this action completes, you have an up to date copy of your database.
Database Changes
- If you are changing your template, Go to Admin > Tools > Template Selection and set your template to Responsive Classic (since your old template won’t exist on your updated site).
- Visit each of the admin pages Modules > Shipping, Modules > Payment, Modules > Order Total to allow your modules to insert any missing keys. Some modules may require re-installation to add keys.
- Run any install/upgrade steps for any plugins you’ve installed/upgraded. And removals for any plugins you’re removing.
Test the temporary new store
Test your customizations. Edit as needed. Compare with the test/demo install performed earlier, as needed.
Test the functionality. Test the look and feel. Make sure things visually perform as expected. Fix as needed.
When satisfied that all is OK, go live, as described below.
4. Going Live
Once you’re satisfied that you’ve tested everything, it’s time to go live.
Checklist
Here are a few things to double-check:
- Visual look and feel is good on both desktop and mobile. Small screens and large.
- Customer login and add-to-cart works correctly
- Shipping quotes are working as expected
- Checkout can complete. (It may be better to test this after really going “live”, with a real purchase)
- As you click around your site, no errors are getting logged in the
/logsdirectory of the test site. Such logs would indicate possible error conditions that you will need to fix. - The Admin pages for your store can properly access product/customer/order data
- Anything specific to the functionality provided by the plugins you added
Put your store down-for-maintenance again
Use the same step from earlier.
Take a fresh database backup
Same step from earlier. This is for safekeeping, and in case anything goes badly wrong. This is the last backup of your “real” data before we upgrade that data to the new format used by the new version.
Go live
To go live, do the following:
-
look at the live
storefolder’s/includes/configure.phpfile and note the DB_DATABASE name -
rename your live
storefolder tostore_old -
rename
store_newtostore -
Edit the
includes/configure.phpandadmin/includes/configure.phpfiles to:- change the folder references from
store_newtostore - change the DB_DATABASE name to match the OLD database
You’re using the “old” DB_DATABASE name here, because you’re actually going to keep using the REAL database, so you don’t lose any data.
- change the folder references from
Remember that your
configure.phpfiles on your server are typically set toread-only, and thus in order to upload these edits will require that you mark those filesread-writebefore uploading.
-
Run
zc_installagain to upgrade the database (because now you’re using the real database) -
Re-run any plugin installation/removal scripts just like you did for the temporary testing. (This is why you took notes of any special things needed for each plugin)
-
Visit each of the admin pages Modules > Shipping, Modules > Payment, Modules > Order Total to allow your modules to insert any missing keys.
-
Update your PHP version if appropriate.
Verify
- Create a test order, take it all the way through to checkout success, then view the order in your admin. Make sure everything is working as expected. It’s a good practice to test each of your payment modules by running a test order.
- Test the store to be sure that things are operating as desired.
- See the checklist above. Test those things, and everything else you can think of.
- Turn off
Down For Maintenanceso customers can shop
If you have small problems to repair, turn “Down for maintenance” on and off again as necessary.
Cleanup
-
On the server, delete your
store_olddirectory. (Don’t leave old stuff sitting on the server because it can lead to security issues or unexpected bad side-effects. You don’t want anyone to buy something from the old site!) If you need to keep it for reference or in case you want to downgrade, be sure to rename it to include the date and something random, and set a reminder on your calendar to remove it within the next week! (Downgrading is never recommended anyway.) -
Update your lists of plugins/templates/customizations that you prepared. Make sure it’s thorough and that your brain will understand it next time you do an upgrade. You will thank yourself later for making sure your notes make sense.
-
If you decided during the upgrade that you’d like to put a different template on your site, now you can start working on that as a separate project, independent of your upgrade.
-
Store your backups someplace for safekeeping. Consider a thumb-drive that you keep with your financial records. The backup can also serve as a snapshot for your data if you need to look back for reference.
-
Delete any extra backups you made, especially if they contained your database or customer data. You should only keep copies that are essential for business recovery or financial/business-reference purposes. Keeping too many backups in too many places that are not monitored for privacy can lead to bad situations. (Consider: you wouldn’t leave customers’ credit card details in papers laying all over your file cabinets and cupboards and drawers: you’d put them in one central safe spot. Do the same with your backups, and destroy copies that don’t need to be kept.)
After Golive
- Check out the Regular Periodic Maintenance thread for things you should be doing regularly.
- Be sure you are subscribed to the Known Bugs thread for your release. Update your store as fixes are announced.
Example Upgrade Scenario:
Suppose you are currently running Zen Cart 1.5.1 and you want to upgrade to Zen Cart 1.5.6c.
At a high level, these are the steps to use (we will skip over the New code familiarization step).
- Download your live store files, and put them in a folder called
store. - Download a fresh copy of Zen Cart 1.5.1, and put it in a folder called
zen_orig. - In WinMerge compare the files in
storeto the files inzen_orig, noting your changes/customizations/plugins/etc. - Download a fresh copy of Zen Cart 1.5.6c, and put it in a folder called
store_new. Apply the changes you found in the prior step tostore_new.
If using a 3-way compare tool, the two bullet-points above can be combined into one, so the 3-way-compare tool can visually empower you to do the copying of changes necessary. In this case you’d open all 3:
zen_orig,store,store_new, and copy the differences betweenzen_origandstoreintostore_new. As well as still upgrading all your overrides instore_newoverride subdirectories.
-
In
store_new, create the new configure files:- copy
includes/dist-configure.phptoincludes/configure.php - copy
admin/includes/dist-configure.phptoadmin/includes/configure.php - modify these two files, setting the values in them from your original configure files in
store. - In each file, you want two changes:
DIR_FS_CATALOGsetting should refer tostore_newand not_store, andDB_DATABASEshould refer to a new database name, not the original one (since we’re only testing at this point).
- copy
-
Upload
store_newto your server. -
Make a fresh backup of your live database.
-
Create a NEW database in cPanel, using the new
DB_DATABASEname you used in the last step of updating your configuration files. Fill this database from the backup that you just made. -
point your browser to
store_new/zc_install, which will take you through the database update process. -
do any install/remove steps relevant to any addons you’re adding/removing
-
Update your PHP version if appropriate.
-
test
store_new, going through the shopping, buying and order fulfillment process. -
When you’re ready to go live, do the following:
- take a final backup of your live store database for safekeeping
- In your live store, go to
Admin > Configuration > Website Maintenance. Put the store in maintenance mode, and add your IP to the list in theDown For Maintenance (exclude this IP-Address)field. - rename your live store folder to
store_old. - rename
store_newtostore. Edit theincludes/configure.phpandadmin/includes/configure.phpfiles to change theDIR_FS_CATALOGreferences fromstore_newtostore, and change theDB_DATABASEreferences back to the original database name. - run the
store/zc_installprocess to upgrade your live database. - do any install/remove steps relevant to any addons you’re adding/removing
- You’re now LIVE!
- test your upgrade
- take your store out of maintenance mode so customers can use it again
- delete
store_old
Plugin Considerations
In the discussions earlier on this page we assume the changes you have made are things like language file changes or maybe small code tweaks you did. If the changes are plugins, there may be a better way than just porting the old changes forward to the new version: you can check the Plugins Library for an updated version of the plugin. If you don’t see one, you can ask on the plugin’s support thread. It may be best to remove a plugin’s “old” version’s files before installing its new files (consult its documentation and file structure to see if much has changed), in case it’s important that older files be sure to be removed.
Templates
When it comes to templates, if you obtained your template from the Plugins Library, the advice above applies. If your template came from a commercial vendor, you should approach that vendor and ask about an upgrade.
If you are upgrading from 1.5.4 or below, you have another decision to make: Zen Cart 1.5.5 and above are designed to be used on mobile devices as well as desktop devices. Your older template is likely not mobile friendly, so you may wish to get one that is. The built-in responsive classic template introduced in v1.5.5 is a good start.
HOWEVER: If you are changing your template, YOU SHOULD CONSIDER TREATING A CHANGE OF TEMPLATE AS A SEPARATE STEP FROM YOUR UPGRADE.
Tweaking templates “to perfection” can endlessly delay implementing an upgrade if you aren’t diligent.
Better to complete your upgrade first, and do your template change as a separate step.
Character Set
Note: If you initially created your store with Zen Cart 1.5.6 or higher, you are already using utf8mb4; no action is required.
The MySQL Character set you are using defines the legal characters within a string. Early versions of Zen Cart used the latin1 character set, which can be used to represent English and other Western European languages. (You may also hear this character set referred to as “iso-8859-1.”)
As of Zen Cart v1.5.0 all new sites created database tables with the UTF8 character-set.
As of Zen Cart v1.5.6 all new sites created database tables with the UTF8MB4 character-set.
If your site was created using a Zen Cart version prior to 1.5.6, you may want to consider updating your character set. Using utf8mb4 is currently considered the best practice; it allows you to support a variety of languages, as well as emojis. For guidance on changing your character set, please see this article.
Other terms you might hear which are related to character set:
- collation: how strings are compared during a sort (arranging in alphabetical order).
- accent insensitivity (ai). With accent insensitivity, there is no difference between e, è, é, ê and ë when sorting.
- case insensitivity (ci). With case insensitivity, there is no difference between p and P when sorting.